Monday, August 31, 2015

Delicious Milk Bread

So I've recently discovered the joy of baking bread. And ~ also out of necessity ~ within the span of 11 days, have baked 5 loaves of bread! Haven't bought bread from the store since that first loaf. Of course, I'm not going to go to the extreme by declaring never to spend money on store-bought bread ever again. There will be times when buying will be much more convenient than baking, but for now, homemade is oh so satisfying! And I'm sticking to it as long as I can.

Just for the record, this is not a post to promote a kitchen appliance (I use Thermomix). It's just what I have and it's what I use. And it so happens that it has taken away my aversion to breadmaking by simplifying the process. I had a breadmaker I bought some years back but was never taken out of its box because despite having it, the lack of confidence of my ability to handle breadmaking was more overwhelming. I had the mindset that breadmaking was difficult and tedious and someone with my patience, or lack of it, would not be able to handle it well.

Suffice to say, I was wrong about myself. And it took myself to prove to myself how wrong I was. (Vain gile bunyi statement ni hahhaa!). So please forgive me for basking in the glory of my successful breadmaking endeavours because truth be told, I'm still pinching myself. I can't believe that I AM BAKING BREAD!

If you haven't seen the evolution of my breads, you can see them here from the first loaf, to the third. I made my fourth loaf yesterday, thinking that that could be today's  and tomorrow's breakfast. It's a jumbo loaf, it should last. It didn't. Kids couldn't wait to eat them yesterday. 3 of them had 2 slices of toasts each with some cream cheese for their afternoon snacks. My better half had a slice for supper. So did I. And by looking at what was left this morning, I knew I had to make another loaf, or else there won't be enough for everyone for tomorrow's breakfast.

But this time, though I still used the same milk bread recipe, I thought I'd shape it into a braid. Being one who is still very much a novice, I had some difficulty portioning and rolling the dough into logs. Couldn't get them to turn out smooth and even. 

But braid it, I did. 

And here's the final outcome.


Urghh! Unsightly!
Clearly, I need more practise. See how uneven the surface of the crust is? 
And I might have stretched and worked the dough too much while shaping that you can see the 'strain' on the dough. Almost look like that of the human muscles that we usually see in human anatomy pics hehehe!

But thankfully, inside, just as soft and fluffy as it should be...


 And here's to give you an idea of the size of that baby...


I usually bake this bread in a jumbo sized (11" long) bread pan, so I know that it would only rise on top and not expand at the sides. I was quite surprised to see how large it turned out when braided.

Oh well, that only means it'll go further before it runs out. Everybody can have a little more of that yummy bread. And I kid you not, it is yummy. Especially when toasted.

You have to try it for yourself.

MILK BREAD / ROTI SUSU

Ingredients/Bahan-bahan

300ml milk/susu
50g butter/mentega
2 tsp/sdt instant yeast/yis segera
40g sugar/gula
550g bread flour/tepung roti
1 1/2 tsp/sdt salt/garam

Steps

Combine all ingredients together and knead until you get a smooth dough that doesn't stick to the side of the bowl. I kneaded mine in the thermomix for 7min although the recipe calls for 3 minutes only. You might require more time is you're using a stand mixer with a dough hook (probably up to 10min), and longer if kneading by hand (up to 14min).

Form dough into a tight, smooth ball and transfer into a well oiled bowl. Cover and leave to rise in a warm spot for about 45min - 1hr.

After the dough has risen, punch it a few times to release the air bubbles.

Divide dough into 3 equal portions, roll each portion into a long strand of about 14" long and then braid the 3 strands together to form a braided bread loaf.

Transfer onto baking tray lined with baking sheet, cover lightly with cling wrap and leave to rise again for another 30-45mins.

Meanwhile, heat oven to 180ºC.

After 2nd rise, brush the risen loaf with egg wash (1 egg and a little milk mixed together) and bake in oven for 30min.

Cara-cara

Satukan kesemua bahan dan uli sehingga mendapat doh yang lembut dan tidak melekat di sisi mangkuk. Saya cuma uli selama 7min dengan Thermomix tapi jika anda ada stand mixer yang ada cangkuk roti, anda perlu uli lebih lama sedikit untuk dapat doh yang lembut dan licin. Uli dengan tangan pun boleh, cuma tambahkan masa menguli, kemungkinan sehingga 14min. 

Setelah diuli, bentukkan doh menjadi bentuk bola yang padat dan masukkan ke dalam mangkuk besar yang telah disapu minyak. Tutupkan dan biarkan ia mengembang sendiri selama 45min - 1jam.

Setelah doh mengembang selepas jangkamasa yang ditetapkan, tumbuk-tumbukkan doh untuk mengeluarkan udara yang terkumpul di dalam doh.

Bahagikan doh kepada 3 bahagian, dan golek2kan setiap bahagian menjadi seperti tali sepanjang 14". Pintalkan ketiga2 tali seperti mendandan rambut Barbie doll hahaha! (Dah start merapu dah aku...)

Alihkan roti yang telah dibentuk ke atas talam yang telah di alas kertas minyak. Biarkan doh mengembang sekali lagi selama lebih kurang 30-45min.

Sementara itu panaskan ketuhar ke suhu 180ºC.

Setelah doh cukup naik, sapukan doh dengan sedikit campuran telur dan susu sebelum di bakar selama 30minit.

HAPPY BAKING!

And I proudly fly the nation's flag...


Selamat Hari Kebangsaan, Malaysians.

Saturday, August 29, 2015

Cakoi menjadi, I puas hati!

Pagi tadi bangun tengok-tengok tak ada apa untuk breakfast. Sebenarnya memang sengajalah tak sediakan apa-apa sebab semalam cadangnya nak ajak family breakfast roti canai sedap Saberkas hari ni. But unfortunately, Aisyah demam last night and I didn't get enough rest maka malas lah nak keluar.

Mulalah I gelabah sorang-sorang, nak buat breakfast apa ni weh? Nak buat roti, lama lah lagi nak siap, paham-paham je lah proses nak menaikkan roti tu pun dah berejam. Nak buat nasi goreng, nasi semalam ada seciput je. Kalau nak buat kena masak nasi baru and I don't like nasi goreng with freshly cooked rice. Melekit. Tak best. Dia kena nasi sejuk semalam baru best.

Akhirnya, I thought... apa kata kita buat cakoi? Although masih kena let rise, tapi taklah seteruk roti. Setengah jam ke 45 minit dah cukup. Dah tu sekali je, tak perlu dua kali macam roti. Maka I pun cepat-cepat "selongkar" komputer cari resepi yang I pernah simpan once upon a time.

Inilah hasilnya...


Nampak tak betapa menggiurkan rupanya? Sorry lah angkat bakul sikit, but really, I am so satisfied with the outcome. My first attempt at making cakoi was like 4-5 years ago. Masa tu hasilnya sangat mendukacitakan. Keras kejung! So I shied away from ever attempting another cakoi.

But today, I have renewed confidence after having baked loaf bread successfully 3 times the past 2 weeks. I thought it's time I gave it another shot. Besides, this has been in my mental to-do list for awhile heehehe! And I was not disappointed. They were crispy on the outside, tasted delicious and hollow inside, exactly the way a cakoi should be. And most importantly, tidak keras kejung! Hahaha!

So here's how it's done. I'm going to write down the ingredients in Bahasa Malaysia. If you want the English version, kindly hop to the original blog where I got this recipe from. My sincere thanks to the blog owner of My Kitchen for sharing this recipe.

Senang je nak sediakan doh nya dengan my thermomix. Yang ada stand mixer, boleh je pakai doh hook and knead away. If you don't have any of these kitchen helpers, sweat not. Uli je lah manually. No hal!

Bahan-bahan yang diperlukan ialah:

200ml air/susu (saya pakai susu Dutch Lady UHT)
220gm tepung roti (saya pakai tepung Nona)
1/4 sudu teh yis segera
1 sudu teh gula
1/2 sudu teh serbuk penaik (baking powder)
1 sudu teh garam
1 sudu besar minyak masak
Minyak untuk menggoreng, secukupnya.

Cara mengadun doh:

  1. Bubuh semua dalam mangkuk dan uli lebih kurang 5 minit, kalau pakai mesin. Kalau uli dengan tangan, lebihkan lah sikit masa dalam seminit-dua.
  2. Setelah di uli, taburkan tepung dalam sukatan yang agak banyak ke atas papan canai dan keluarkan doh atas papan canai. Doh ni sangat melekit dan lembut, sebab itu perlunya banyak tepung. Kalau tidak main tarik-tali lah dengan doh ye?
  3. Bahagikan doh kepada dua bahagian, dan golekkan setiap bahagian tu sehingga menjadi satu gulungan dok yang panjang. Saya buat setiap gulungan tu panjangnya lebih kurang 11-12" gitu lah.
  4. Tutupkan doh (saya pakai besen besar yang muat untuk tutup kedua2 batang doh) dan biarkan selama 30-45 minit.
  5. Setelah cukup masa rehat, tekan-tekankan doh itu sehingga leper lebih kurang 1cm tebal, lebar dalam 3-4". Tarik-tarikkan lah doh tu sehingga agak panjang dan dapat ketebalan dan lebar yang disebutkan.
  6. Setelah itu potong-potongkan doh selebar 1" setiap satu.
  7. Tindankan doh berpasang-pasangan (letak air sikit bagi lekat) dan tekan tengah-tengah doh dengan chopstick/lidi basah.
  8. Panaskan minyak untuk menggoreng.
  9. Bila minyak dah cukup panas, angkat satu doh dengan kedua belah tangan, tarikkan doh memanjang dan terus masukkan ke dalam minyak panas.
  10. Goreng sampai perang.
  11. Angkat dan hidang! Sodap makan ketika masih panas.

Andaikata uols tak paham apa yang saya pok-pekkan di atas itu, sila tengok video ni. Sure paham punya!


Selamat mencuba!

Thursday, August 27, 2015

New appliance and the adventures it brings

I recently bought a kitchen gadget, recommended by a friend. As recently as 2 months ago. At first, I wasn't really keen thinking a kitchen gadget is a kitchen gadget lah, just like any other. Kan? Every maker of kitchen appliances will surely make all sorts of claims about their product. Boleh buat itu ini in such amount of time, boleh jimat masa and tenaga so you have extra time to spend with your family, yada yada yada... Heheh!

But anywho, kawan bertuah sorang ni memang bijak. Since she knows my husband too, she promoted the product to him instead, tagging him on FB on every post concerning the gadget complete dengan gambar2 masakan that she herself cooked using the gadget. She kept telling me how much of a help this kitchen appliance would be to me, a full time homemaker to a family of 6. Belilah, kalau sayang bini, katanya...

And she really did cook up a storm in her kitchen with the said gadget to entice us...from all kinds of lauk-pauk, to mouthwatering snacks like chinese steamed buns (I've always known them as "pau"), to homemade chocolate hazelnut spread and sinful dessert like chocolate custard. Yes... I have that image of them chocolate custard in little containers vividly stored in my brain. One day, I too will be making them. Macamlah kalau tak pakai gadget ni takleh buat choc custard kan? Kui kui kui!

Maka suamiku yang vulnerable itu telah termakan promosi kaw-kaw sahabat baikku. I didn't have to mention anything, he himself insisted that I buy the said appliance, "kalau dapat ringankan keje u, I sanggup bayor," katanya. I guess it's true when people say, food is one of the surest ways to a man's heart. Even just pictures of them on FB. Though I have to admit, I did wonder if his insistence was really for my needs, or his. Lol!

And that was how... the Thermomix became a member of my household.

It took some getting used to, some trials and errors... some yays and nays...

I've had my fair share of yays...

To die for milk bread, mee goreng basah, orange cupcakes, heavenly congo bars and mouthwatering pizza.

And an equal share of nays...

...from overbeaten lemon bundt cake, to underbaked bread,  not-so-rolly looking sausage rolls,
messy kaya steamed buns, way below average pizza crust and sigh...
a very watery ayam masak merah. *cry*

But I took it all in my stride. 

Okay, I lied. 

The disappointment from the citrus bundt cake misadventure turned me into a sulky, old hag. But lets not discuss that, shall we? Lol!

Last night, however, was THE moment of sweet triumph for I finally succeeded in baking the best bread I have ever attempted baking.

Prior to TM (that's short for Thermomix), I had never, in my entire life, baked bread. I thought it was something only accomplished bakers dare to try. The thoughts of yeast, proofing, and kneading... all these intimidated me into resigning my fate to eating store bought bread for the rest of my life. After all, getting my favorite "enaknya dimakan begitu saja" loaf of bread was easy.

I even managed to find a close substitute when I moved to Miri more than 5 years ago. So basically, there really was no need to bake my own bread.

Until I gave it a shot and discovered the joy and satisfaction of baking bread!

Why haven't anyone told me this before? Why? Why??

My first loaf was so-so...


Slightly underbaked, didn't taste as good either. 

Then I tried my second loaf using the same recipe but a bigger sized pan...


Looked and tasted better than the first one. I have discovered by now that my oven has some heat distribution issue.

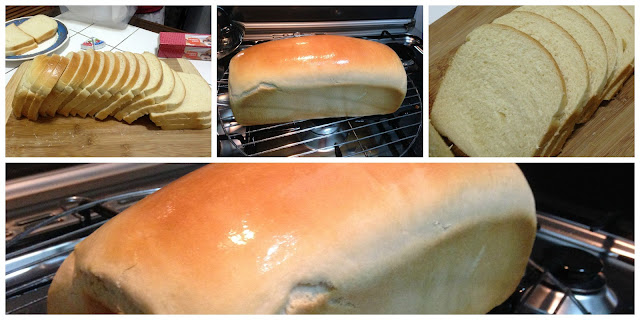
So by my third attempt, I knew that I needed to turn my bread 180 degree to get even baking halfway through baking, and that I needed to extend the cooking time a little bit for it to be thoroughly baked. I switched to a different recipe too. I made milk bread instead of the basic sandwich bread. And what a difference it turned out to be!

See for yourself.


And this, ladies and gentlemen, will be my go-to bread recipe from now on. It's soft and fluffy, and I kid you not, it tastes just like my favorite brand. It fills my requirement that a bread should be "enaknya dimakan begitu saja". For you non-Malay-speaking folks, that means, it's good enough to eat on its own. It really is.

I made this last night. 4 slices were chowed down as soon as it was cool enough to be sliced. We all laki-bini melantak dulu hehehe.... he had his with plain cream cheese, while I had mine with strawberry flavored cream cheese.

I took a quick glance early this morning, only about 1/4 of them left. I haven't had my breakfast yet, so I think I'd better head to the kitchen now.

Takut melepas! Maid akak kuat makan.

Monday, August 24, 2015

Just so I don't forget

I'm putting these here for my own benefit. 

Came across them on FB and I know, if I don't put these here, I will scroll down and forget all about it. There's a higher chance of me being reminded of these poor people's plight and hopefully, spur me to contribute in some way to make a difference.

More than once or twice.

I hope, by you coming across this posting here on my blog, it'll spur you too to lend a hand.

If God decrees it, we will all grow old someday and it could be you or me in their shoes.

May somebody be kind enough to help us when we do end up less than privileged.